large format video camera

well, long time no post but I have a cool one this time!  I just completed designing and building an 8×10 large format digital video camera, the first in the world that I know of. LargeSense has some interesting tests with x-ray sensors (I think?) but this camera can be made for orders of magnitude less cost, and I don’t think they have yet made a fully working camera.  I get into how it works in the video below, but essentially its off-axis reimaging of a projected image.  you lose some light, but with advances in large aperture wide angle lenses (I am using an Irix 15mm f2.4 Firefly) and sensitive cameras (a Sony a7s in my case) this sort of camera is now a practical possibility.  it is a bit like IMAX, but waaaaay bigger 🙂

I used C4d virtual cameras to model the fields of view of the various lenses and ensure that the slider didn’t appear in the bottom of the shot, even at infinite focus.

Screen Shot 2017-12-30 at 3.34.48 AM

if you have any questions or want to build your own, let me know! I am happy to share everything I learned along the building process.  expect to see lots more from this camera and ones like it from me.  light field version next, eh?

MeFoto roadtrip review

hello everyone!  this tripod was kindly sent to me back in December, but I didn’t really see any point in making a first impressions type review, because the true test of a tripod is how it holds up over time.  I have used it for almost every photo shoot since I got it, and my sister has used it for over 100 days of her 365 project.  it has seen quite a bit of use.  lets jump right in. (note, all measurements and weights are calculated by myself, not from the manufacturer.  also, although this tripod was given to me, I am going to state my thoughts just the same as if I got it myself, which I was about to do before I got in contact with Benro.)

the folded tripod (shown here with banana for scale), comes in at a puny 40cm (15.5″ish) with qr (quick release) plate.  it manages to get so small by inverting the legs upwards.  a really nice design I think, as it means the center column is already extended and ready for use. it fits inside carry on luggage with ease, in fact I kept it in my personal item backpack when I have flown trans-continental with it.

ITT_6019

it comes with a lovely orange trimmed bag, a hex key for adjusting the leg tension, and spiked feet to replace the rubber ones if needed.  the extra feet and hex key come in a nice little package that fits into an inside pouch of the bag. the rubber feet that it has work alright, but because the bottom leg section can turn, there really can’t be that much rubber on the ground plane, only a small section.  this is an advantage of tripods with D shaped leg sections. more rubber on the ground = more grip = more stability.  as you can see in the below picture, there isn’t a hex key.  this is because security in Bergamo airport (Italy) confiscated it. no idea what they were thinking, and I doubt this is ordinary procedure anywhere else in the world.

ITT_6021

ITT_6022

the head that comes with the tripod is really quite nice.  it has separate pan and ball locks, a ball friction knob, a bubble level and very smooth movements all round.  it takes the Arca Swiss style qr plate, which isn’t my favorite but is pretty much industry standard and does the job.  it locks onto the ball head  with a knob, not a lever.  this works flawlessly, and is very easy to tighten it to a point where there is no chance of the camera slipping, without busting your fingers.

ITT_6014

the only real disappointments with the tripod were with the qr plate.  it doesn’t have  the right rubber on top, so no matter how hard you crank it onto your camera, after a shoot or two (especially if you are shooting vertical)  it will be loose.  not a huge issue, right? just tighten it up. well, no.  for some reason it requires a key or coin to turn it.  this is the reason I don’t like Arca Swiss style plates, they all seem to not have hand operable knobs for tightening them on your camera.  the turning problem can be solved by buying another brand’s plate, and if you are only using one tripod system, the fact that it needs a coin to operate won’t be an issue.  but for me, it was a pretty big annoyance (as I do switch systems) so I went ahead and switched the plate holder from an old Manfrotto ball head and screwed it onto the lovely  MeFoto ball head.  perfect.

not enough rubber

not enough rubber

here is the manfrotto plate holder on the MeFoto head.

here is the manfrotto plate holder on the MeFoto head.

woohoo! adjustable by hand!

woohoo! adjustable by hand!

the leg angle locks work perfectly, they can be either at a normal tripod angle (30 degrees ish) and the low down 80-ish degree angle.  they are not sprung, so they don’t ‘click’ into place, but they feel very solid and work very well. the leg length locks also work well. it takes about a half of a turn to lock/unlock the legs, and they lock very solidly.  I have used the tripod in heavy rain and snow, with no ill effects, and occasionally in sea water, but in those cases I always have been careful to not let the sea into the leg locks, other then on one occasion but I disassembled it  and cleaned it afterwards (according to this fantastic guide on the MeFoto blog).  the leg locks feel as smooth and precise as new (which is to say, smoooth).

leg angle locks.

leg angle locks.

leg locks

leg locks

one really cool feature of the tripod is that it can convert to a monopod! just unscrew one of the legs, take out the center column and put them together! it works very well, though I don’t really have much need for a monopod.

the carbon fibre version I have weighs in at 1.389kg (3.0625 pounds) with head.   the tripod itself weighs 1.066kg (2.35 pounds) and the head weighs 323g (0.7125 pounds).  the cheaper aluminum model apparently weighs 1.633kg (3.6 pounds).  I am not sure if the difference of 0.5 pounds really is worth the difference in price of $140, but that is up to you.  there certainly are more budget options in the world of carbon travel pods, but the aluminum one is a very good deal. also, for some reason the carbon isn’t available in all those awesome colors, which is a shame.

the tripod has a maximum hight of 153.7cm (60.5 inches), and a minimum of 38.7cm (15.25 inches) the monopod’s max hight is 161.3cm (63.5 inches) and its minimum is 71cm (28 inches).  basically, the tripod is tall enough for any travel pod use, but maybe not short enough for a landscape enthusiast. a shorter center column would be a fantastic add on.  the monopod is tall enough for really anything, and I don’t know anyone who uses a monopod at anything but full extension.

over all, it is the nicest tripod I have owned (I have had an entry level manfrotto and a old gitzo) or used. for what I do, with the qr plate holder swap, it is pretty near perfect and I can’t see needing to upgrade unless my camera system gets a lot bigger. any light tripod will blow over easier, and not be as stable as a heavier one, but that is a compromise I am okay with making.

‘finland’ BTS

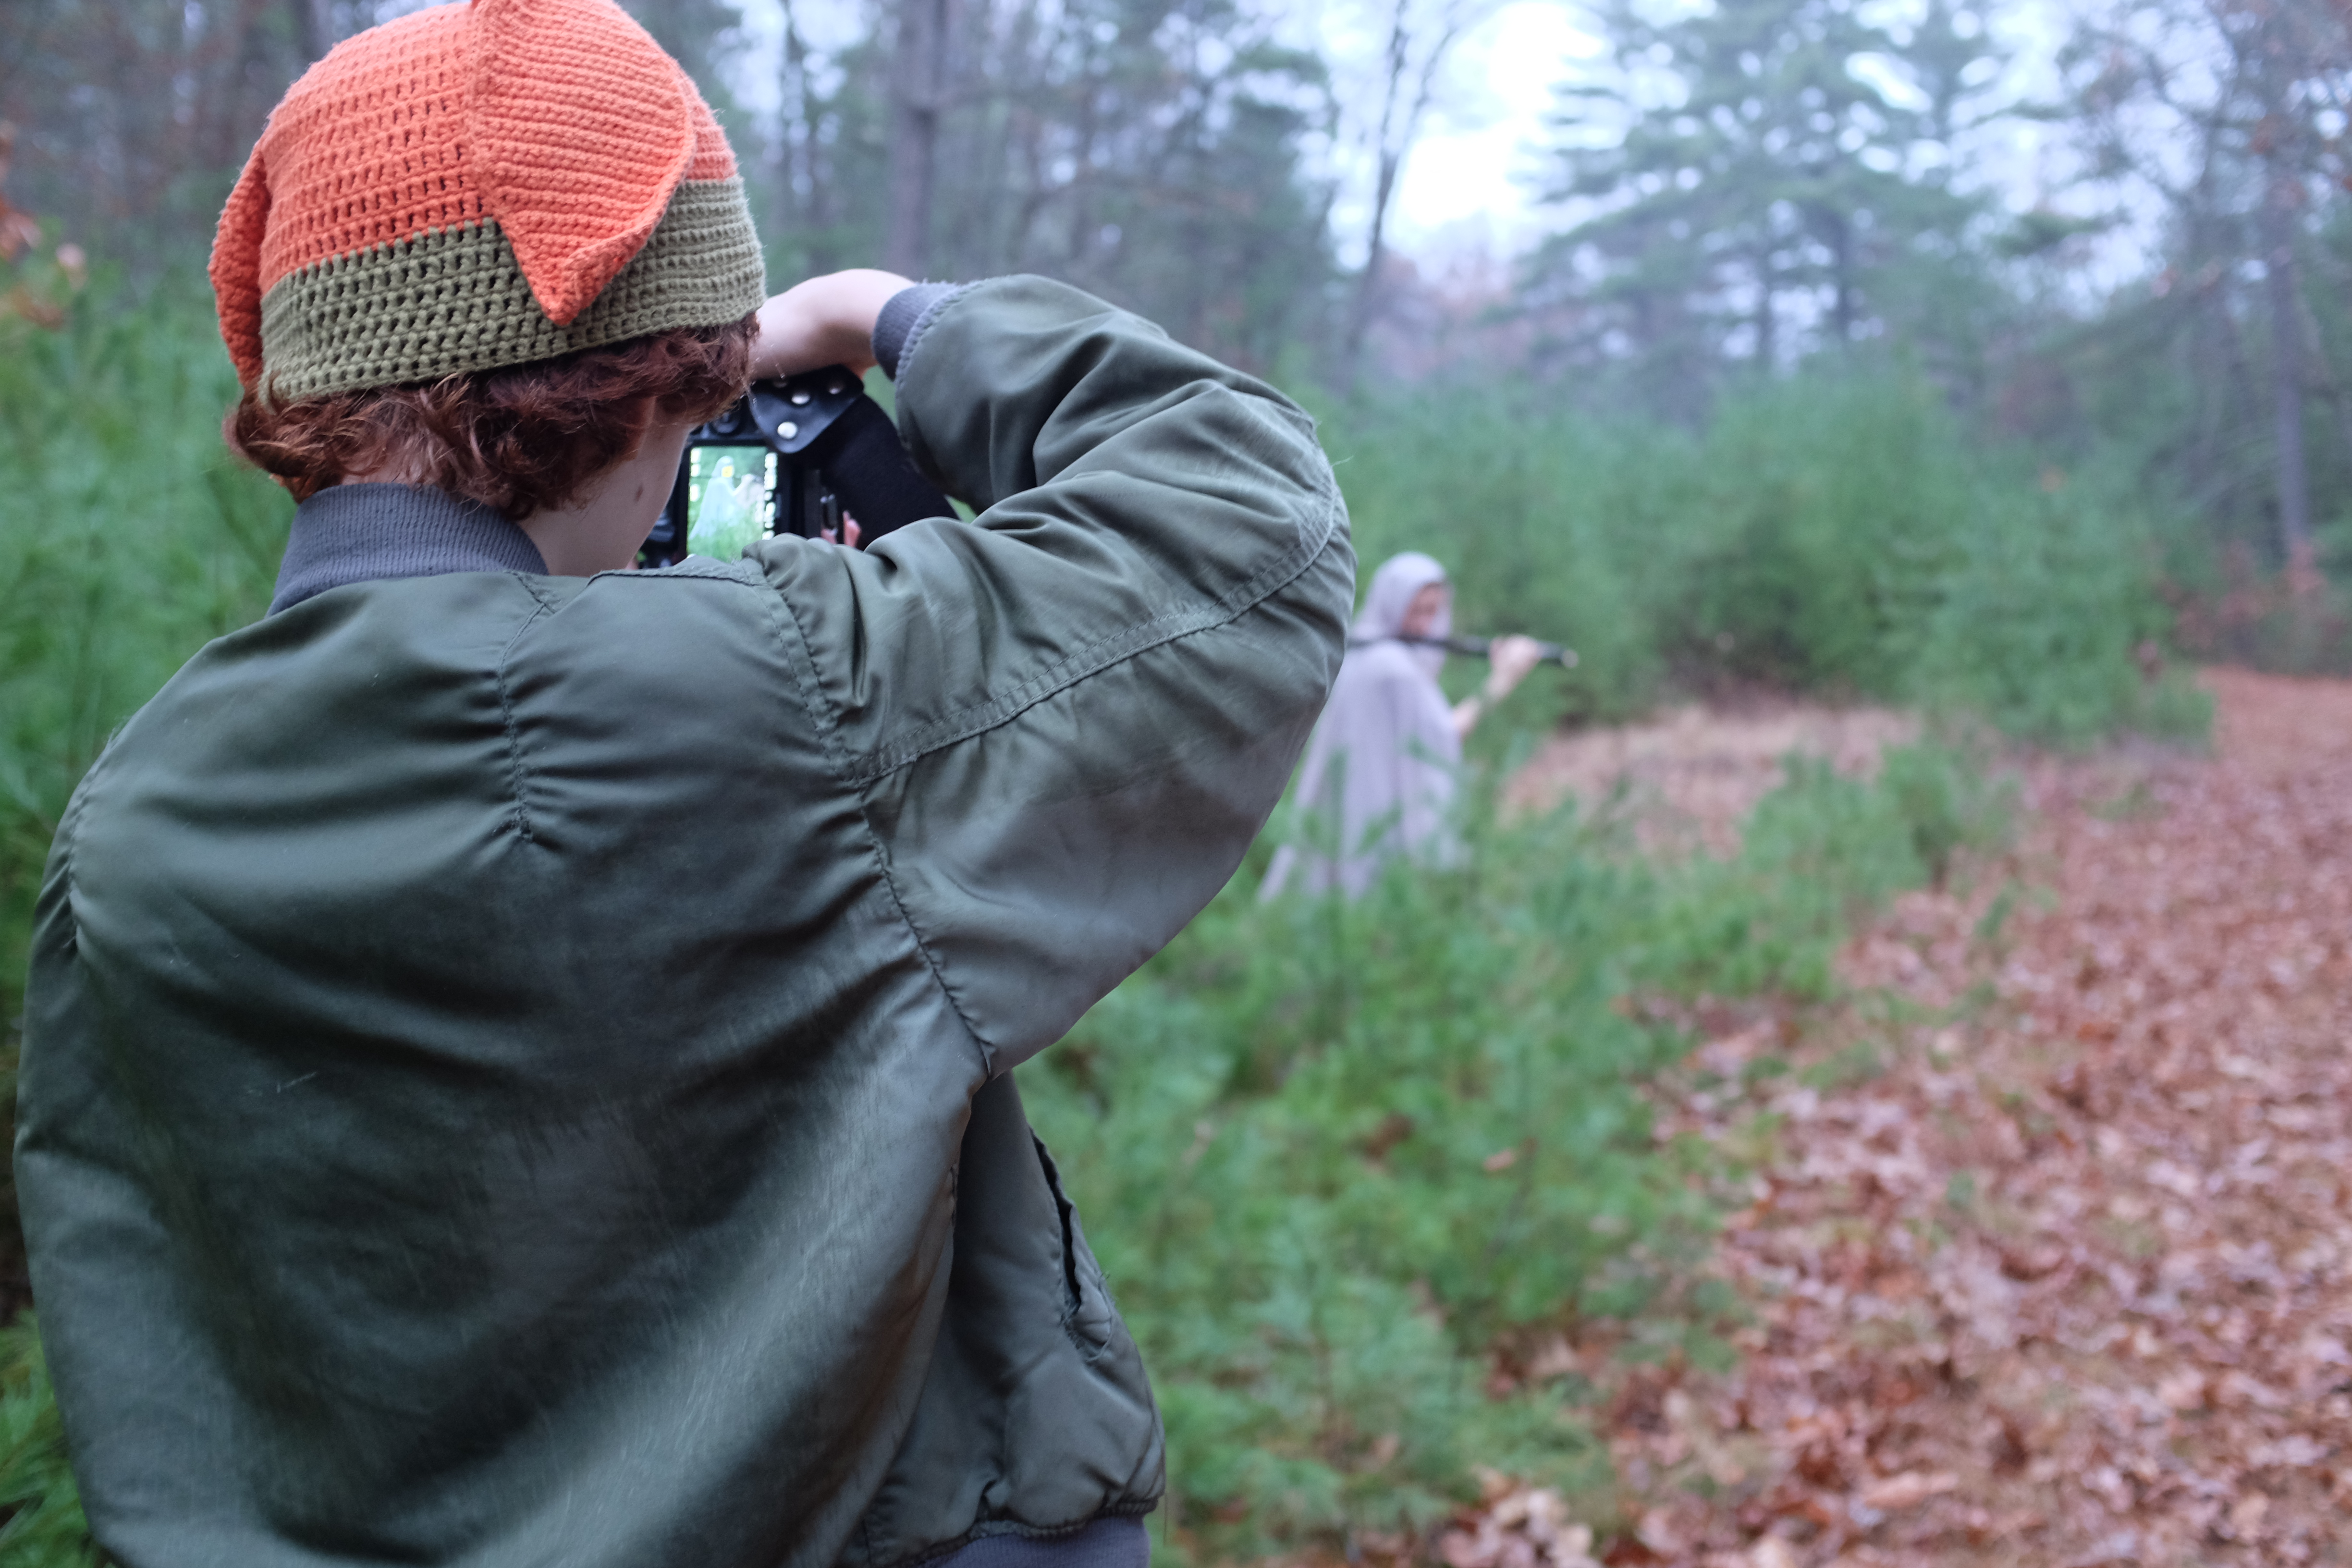
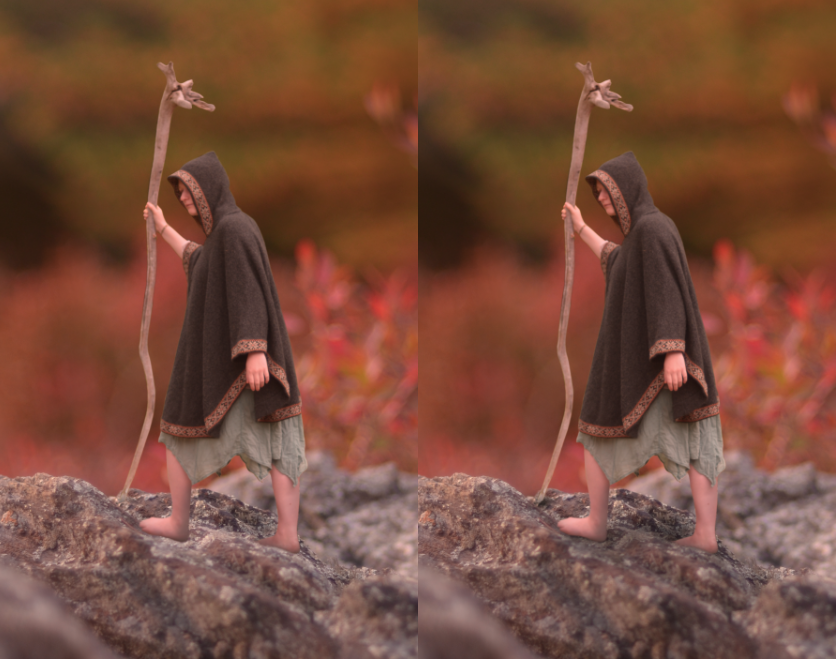
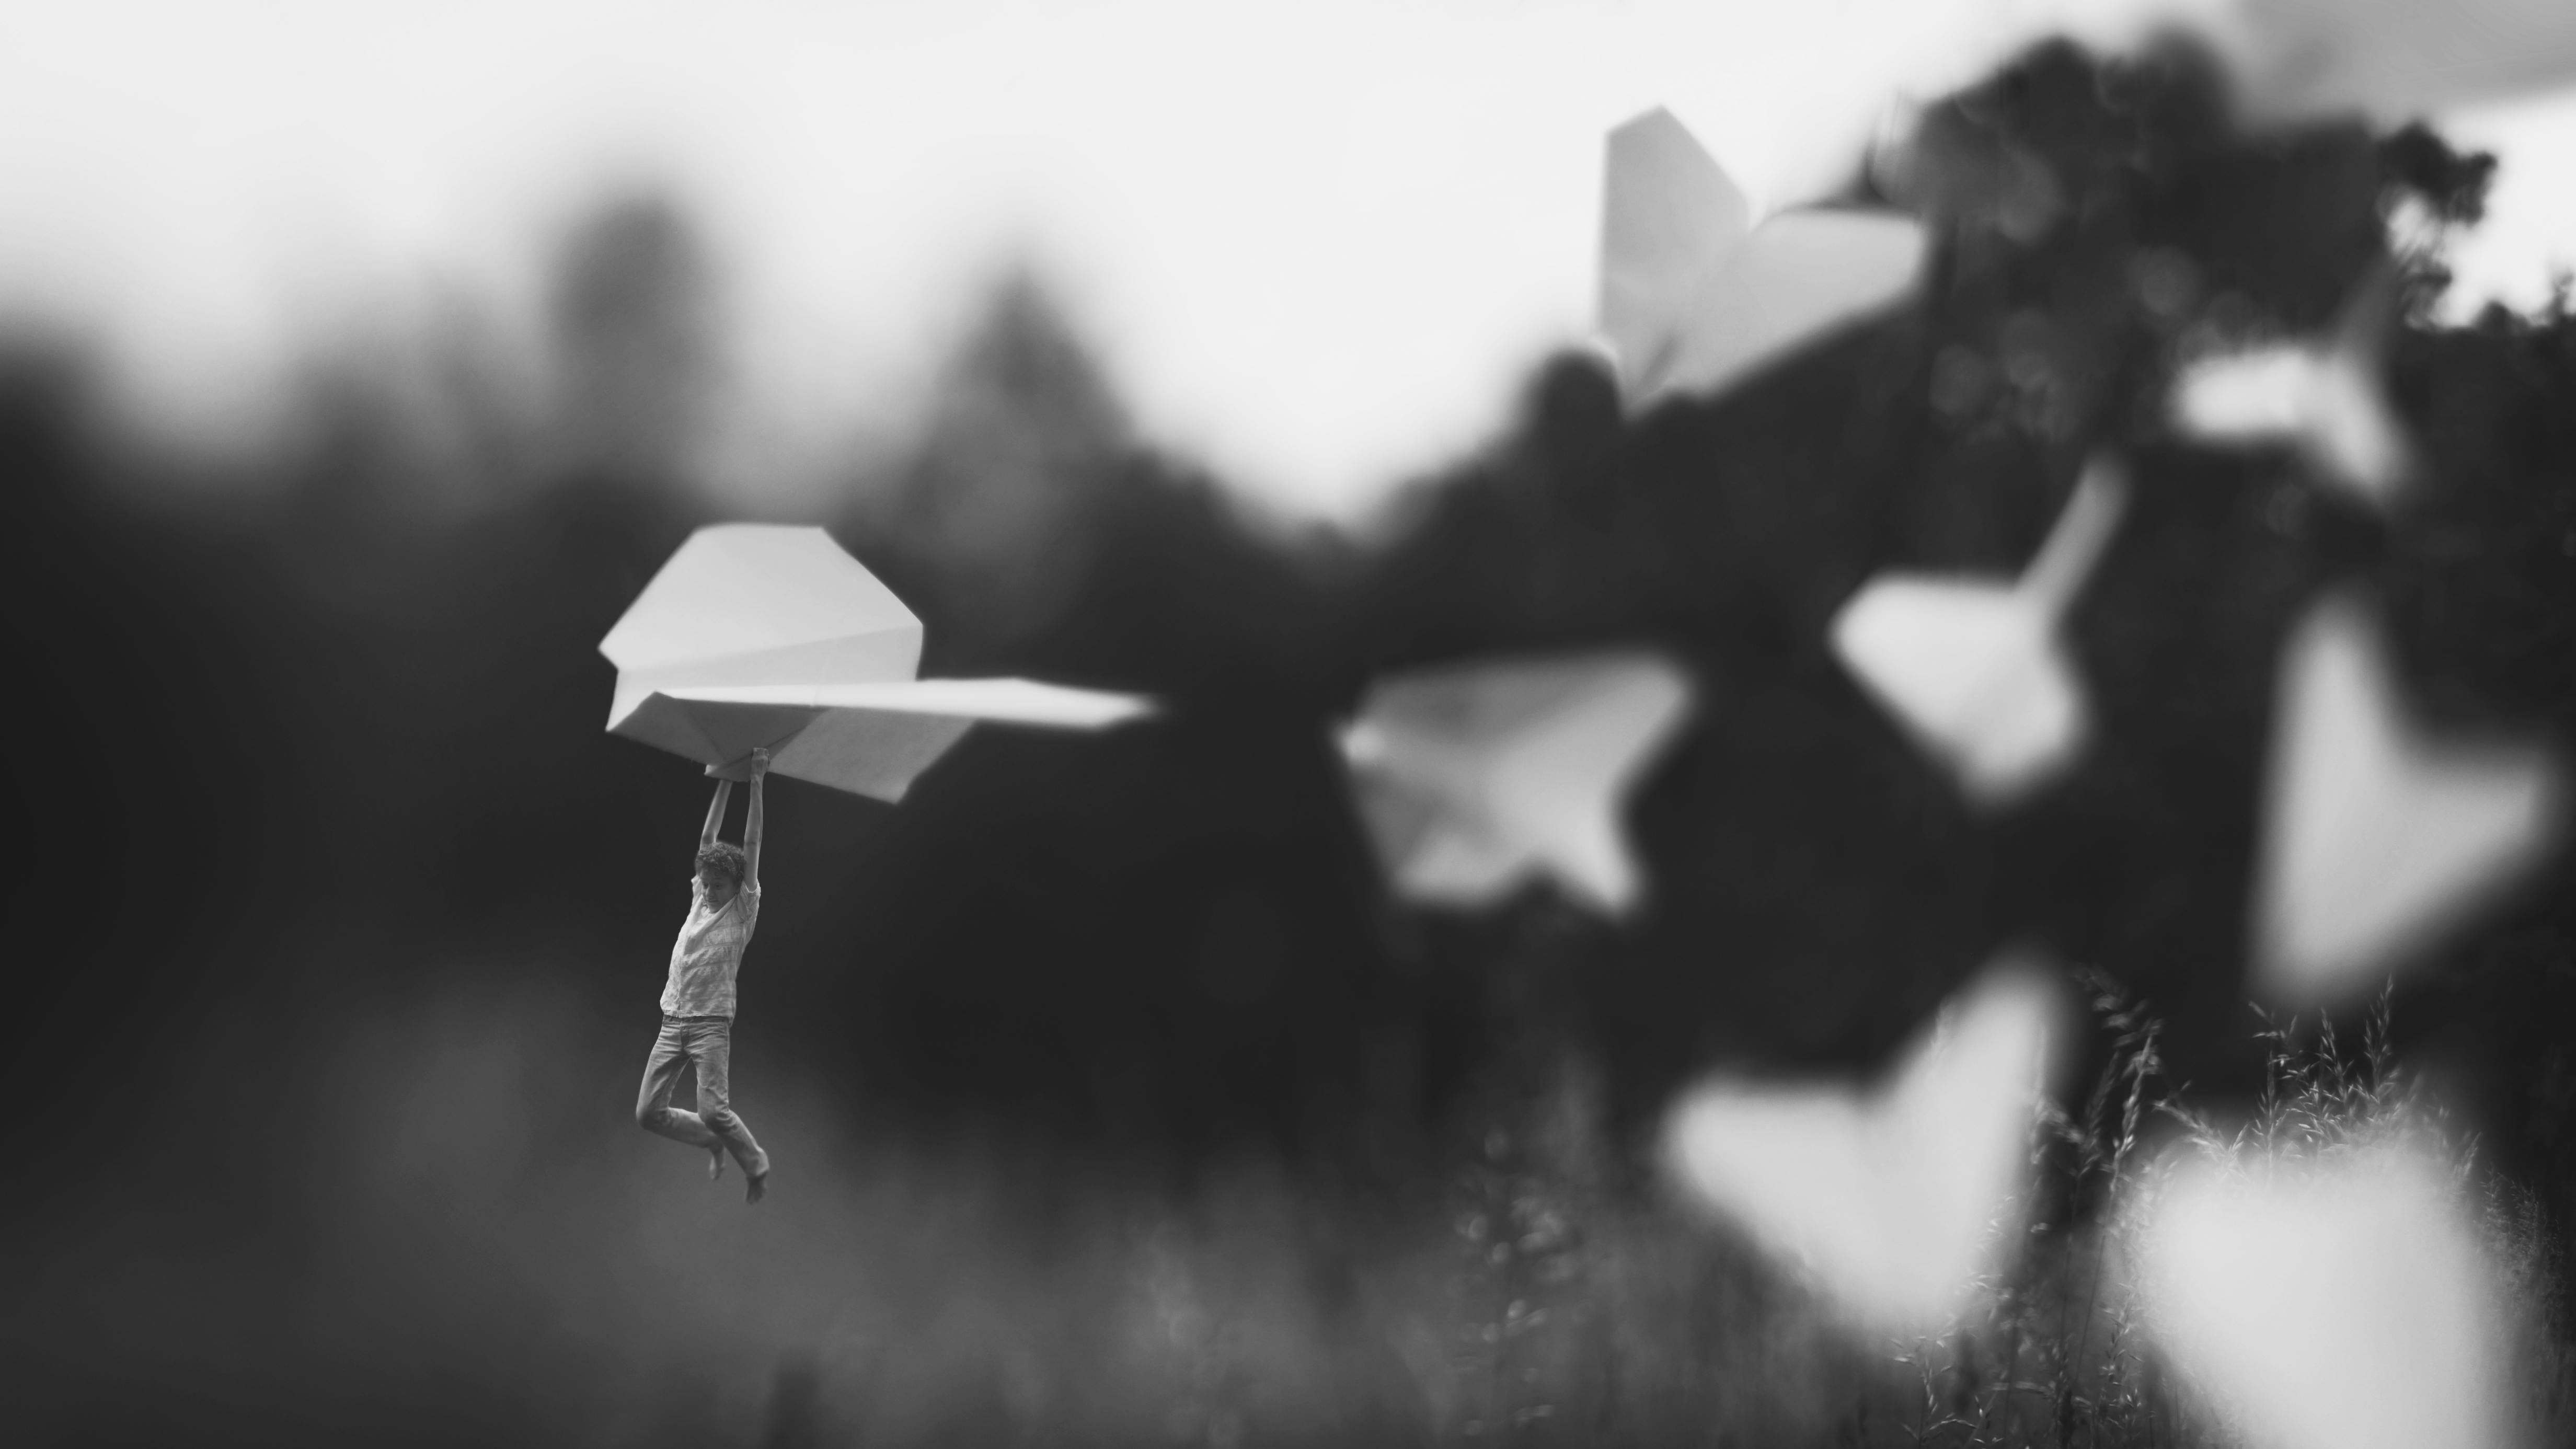
hello everyone, It has  been a long time! it has been a crazy time for me, and the fact that this picture is from finland I suppose illustrates that. anyway, here is the behind the scenes of my latest picture “finland”.  it was taken on a frozen lake with the most amazing snow on it.  the snow flakes were gigantic (in fact, you can see them in the picture if you zoom in) and so light, fluffy and crunchy you could literally blow them away just by sweeping your hand near them.

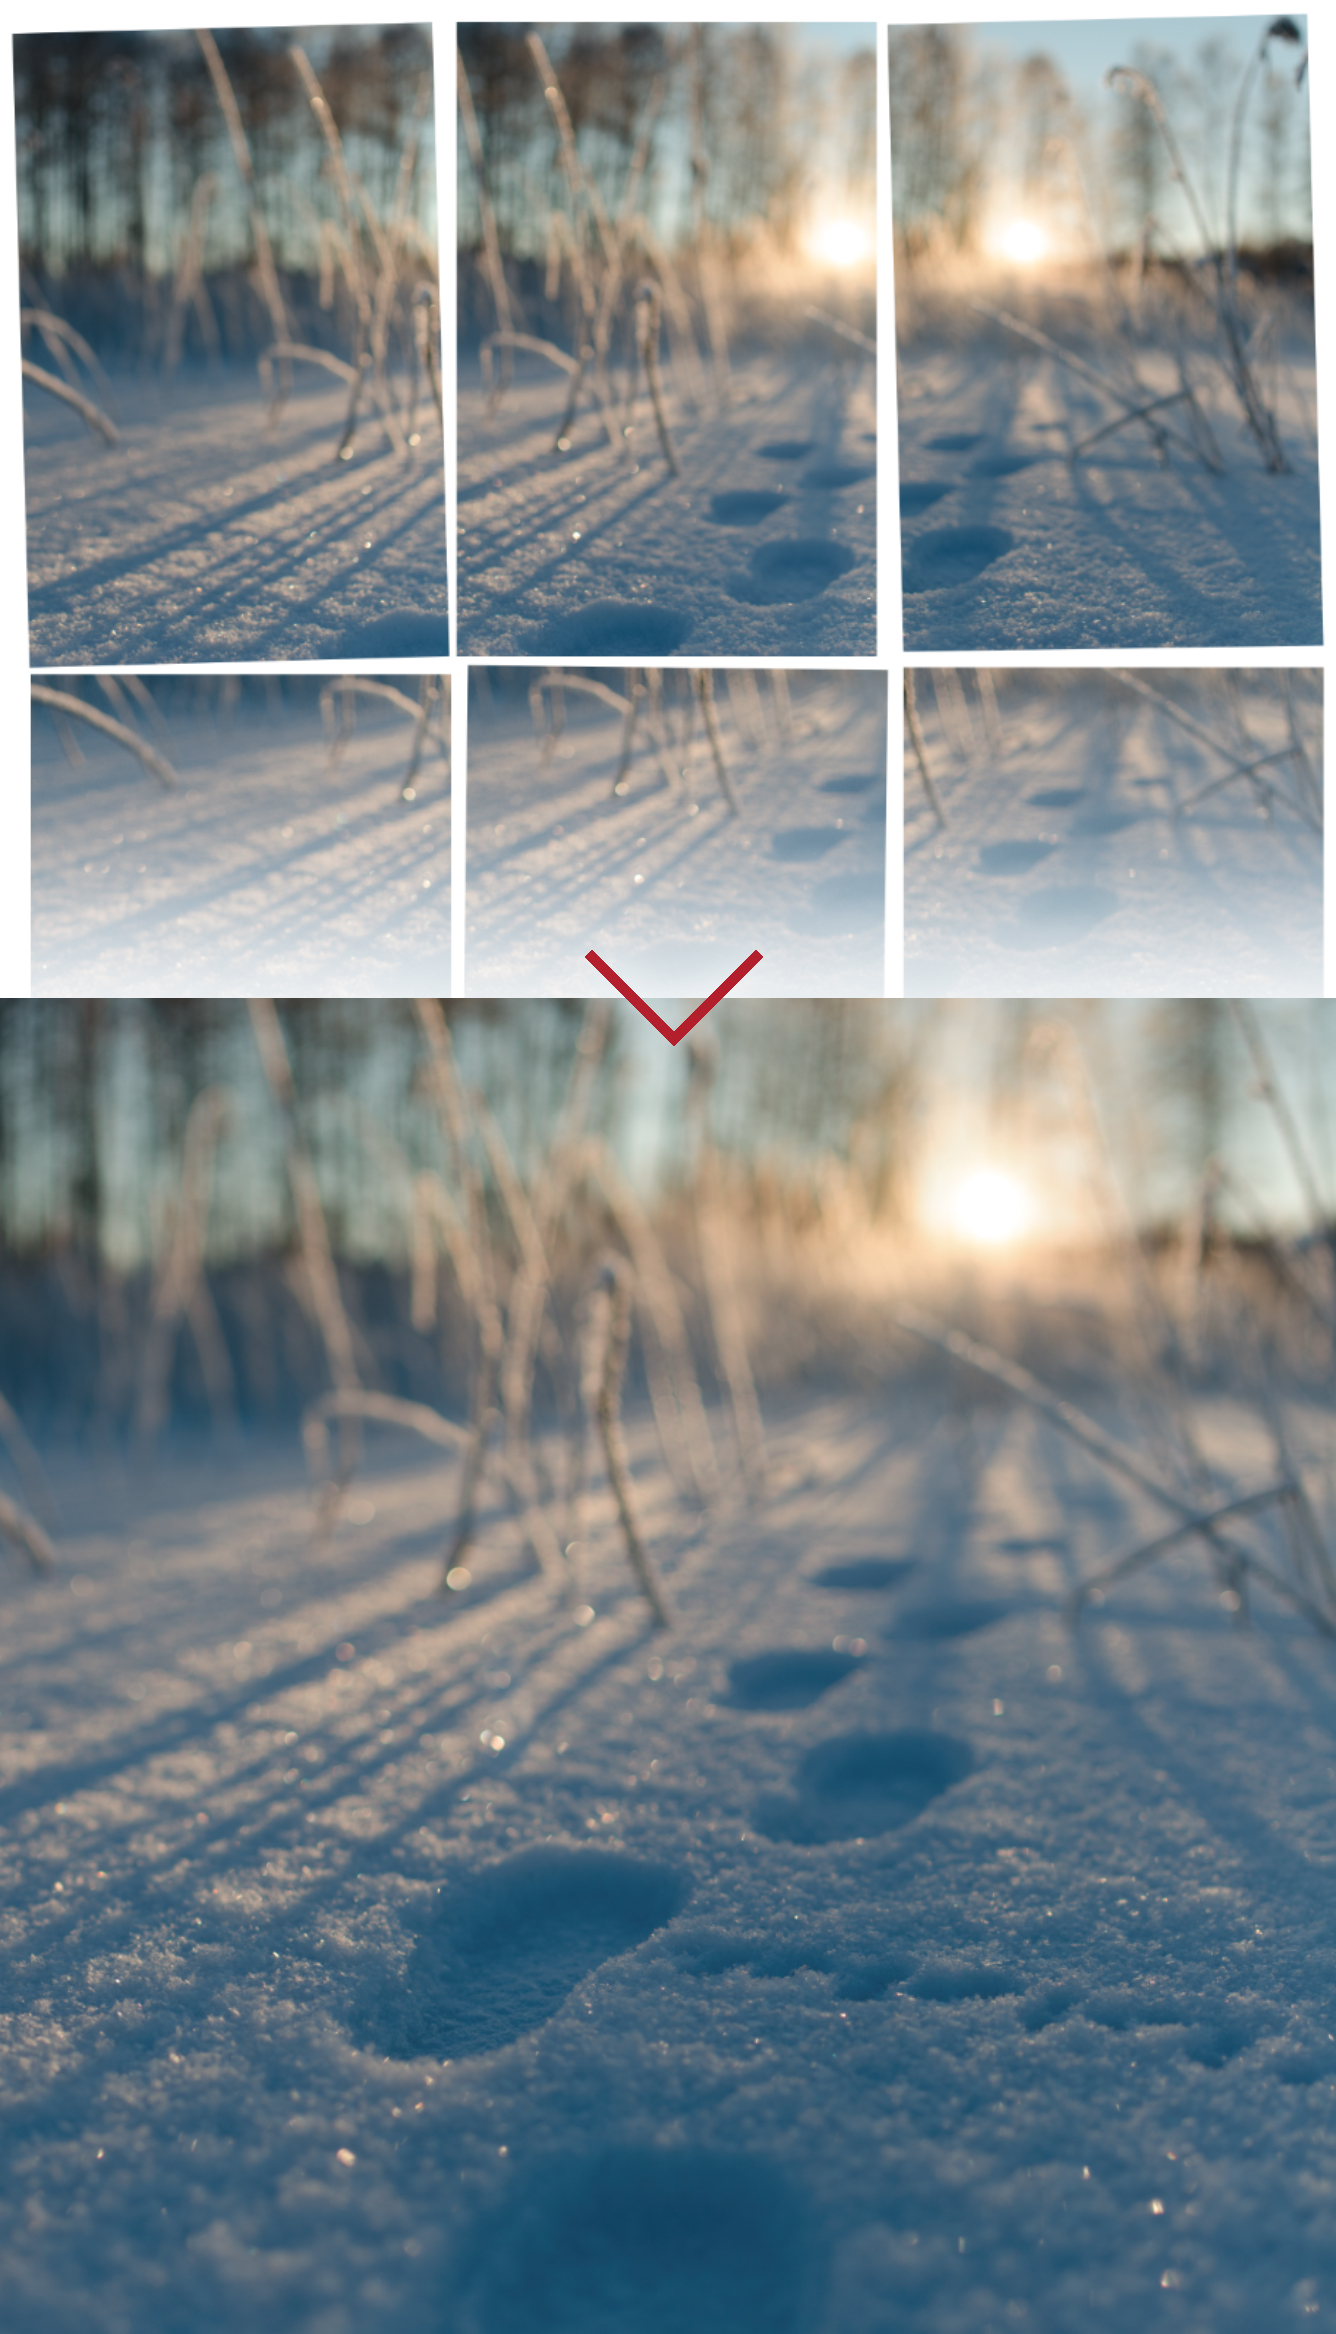
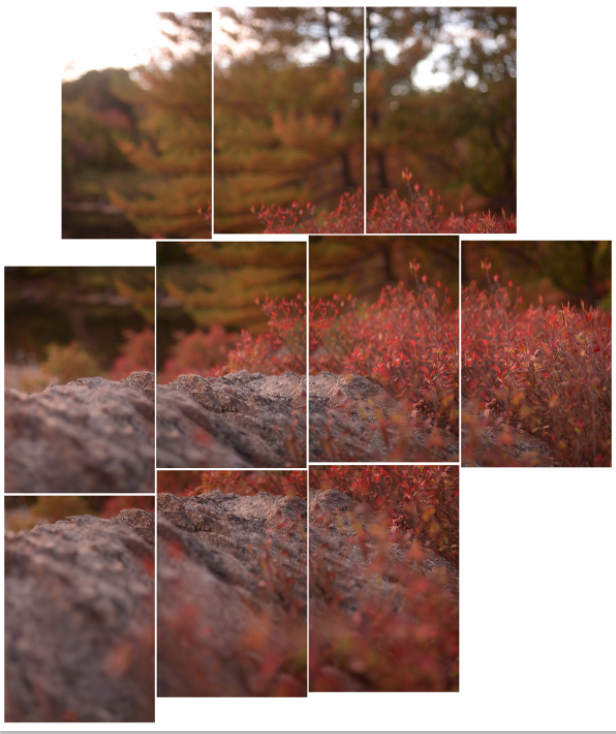
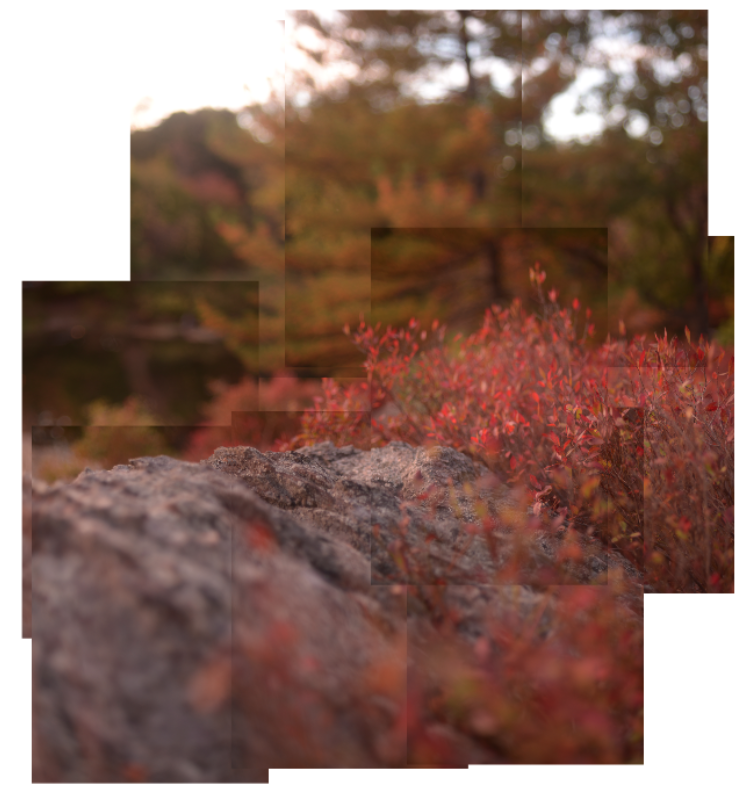
this was one of my favorite pictures to color grade, it just worked, and along the way of adding the littlefolk I learned some new techniques.  lets get started. this picture was taken with my Nikon d7000 and a 35mm f/1.8 at f/1.8. the big footprints are mine, and the little ones I made with my glove. it is a collage of 6 pictures so the final shot was equivalent to a 25mm f/1.3 (calculated using this lovely extension calculator). first thing I do is merged the 6 shots:1

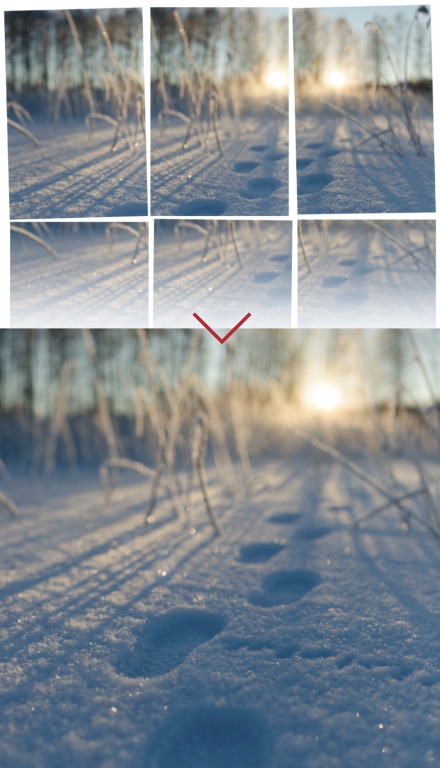
since the sun was setting, I didn’t have a chance to photograph my models before the sun set.  turns out, there wasn’t another sunny day for the rest of the time we were in finland.  I always try to match conditions as closely as possible between my littlefolks and their backgrounds, but I really wanted this picture to be of one of the people from finland (Tiina) and also the family’s lovely dog (Eddie).  there was nothing for it, I had to take the pictures in cloudy weather.  this added a lot of extra work for me, but, all’s well that ends well.

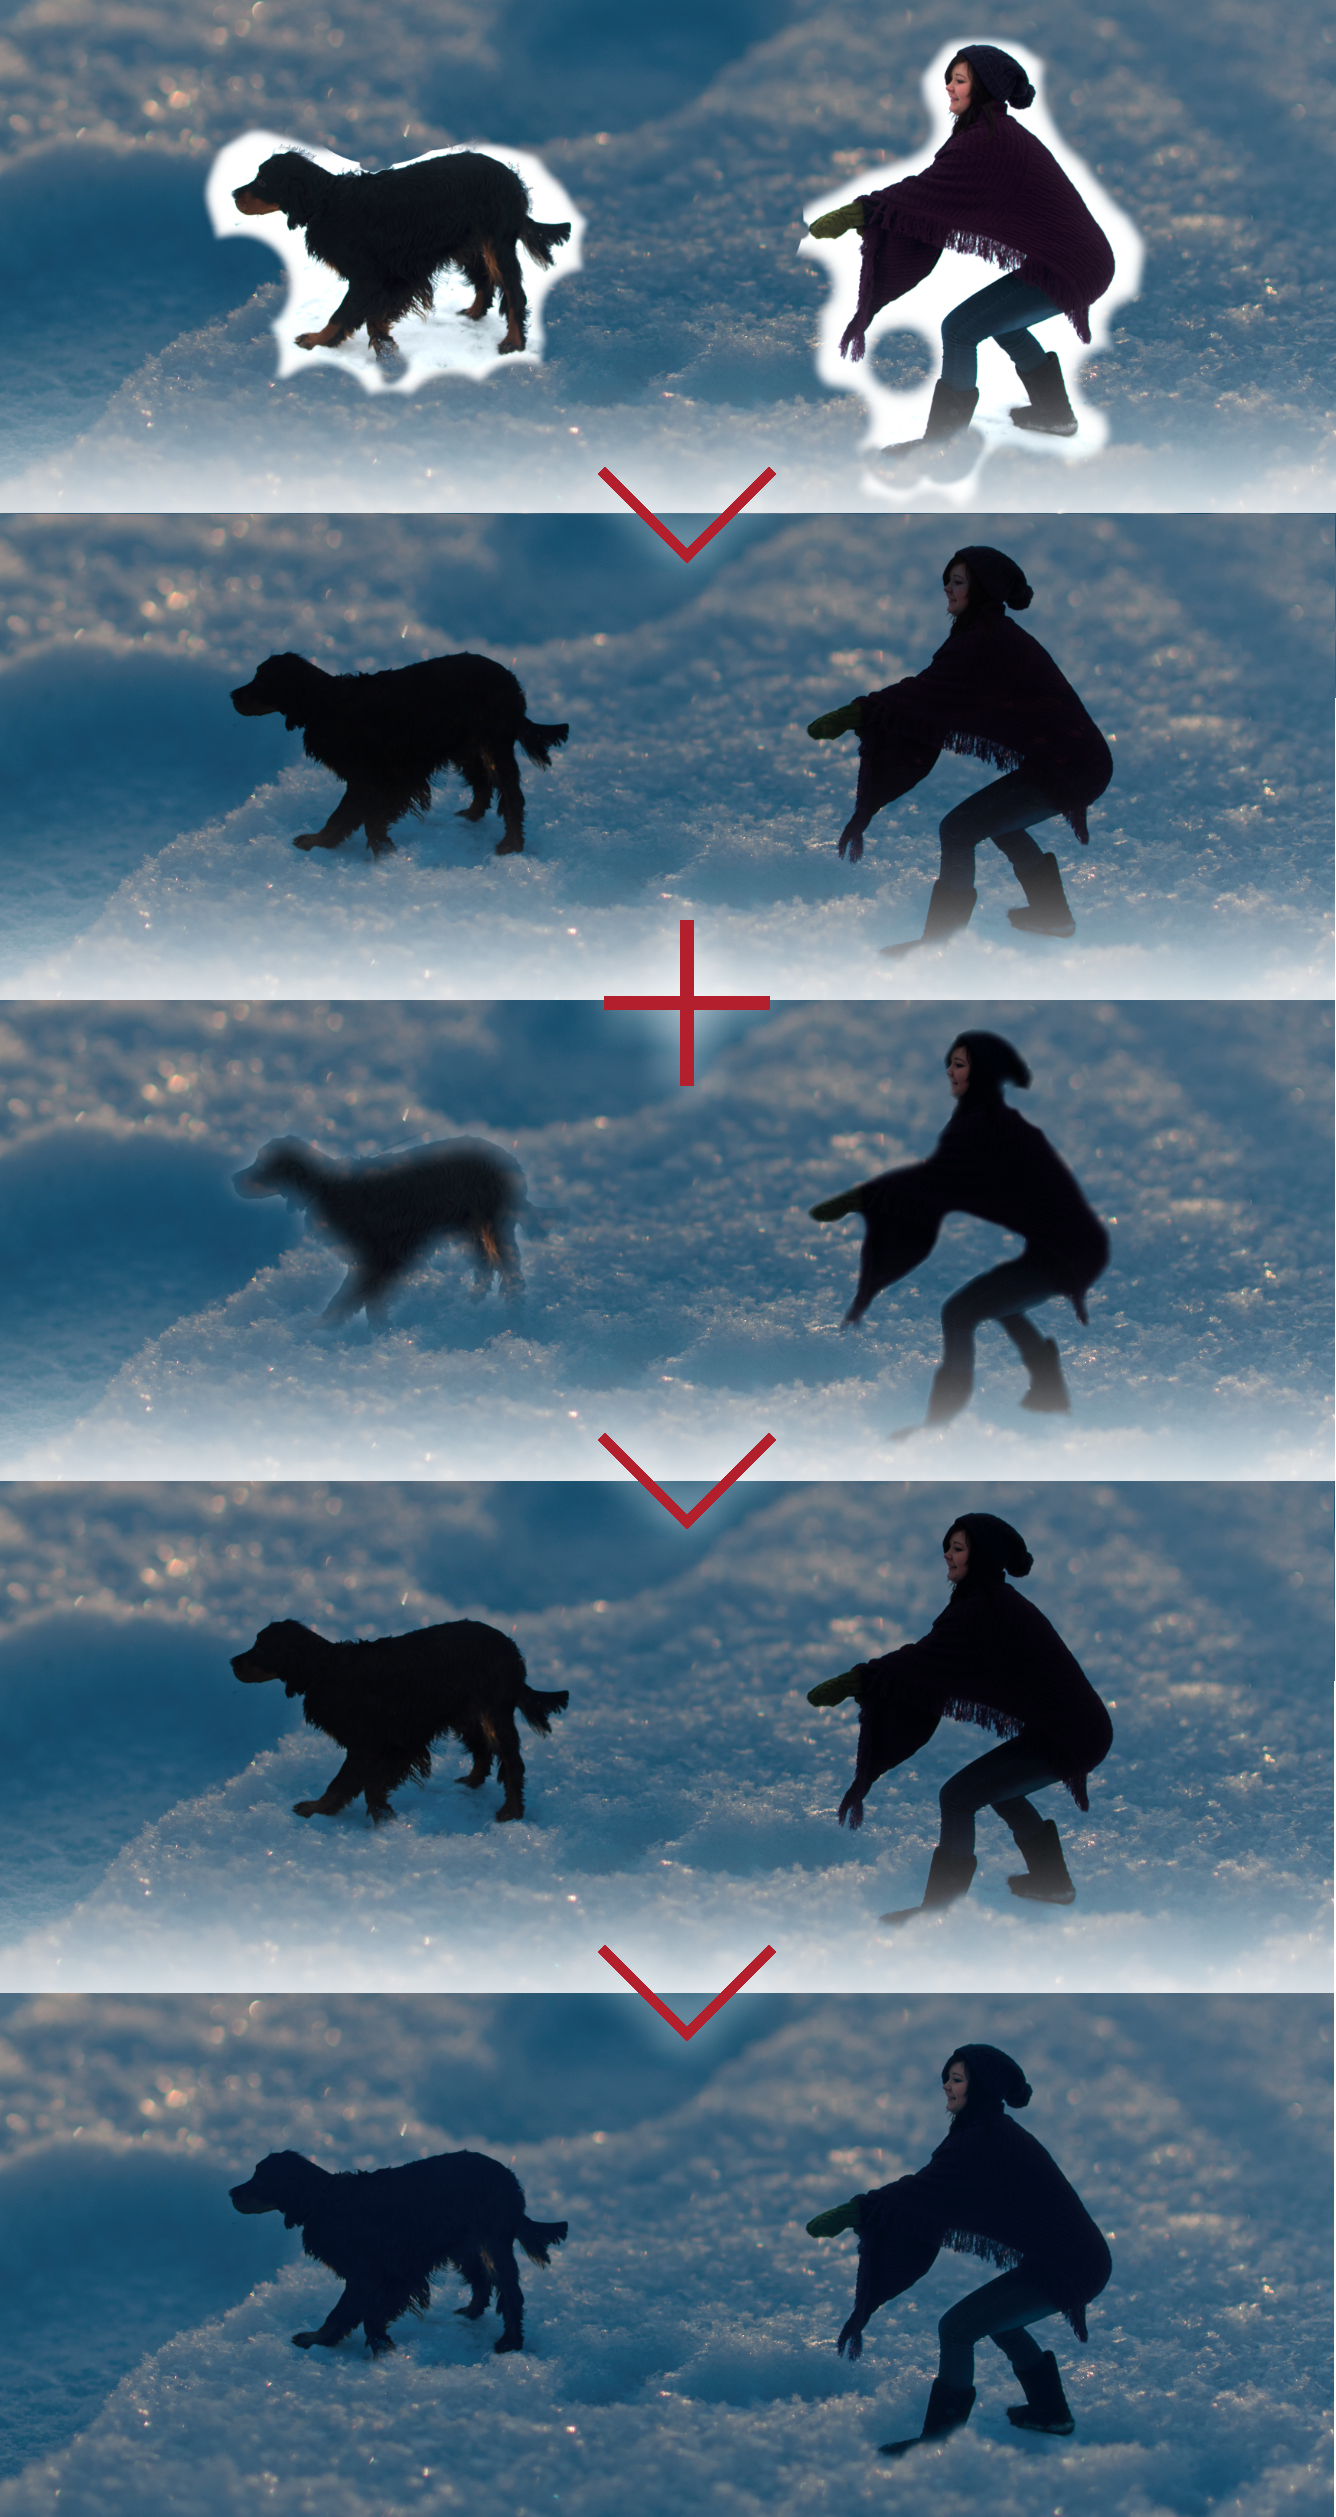
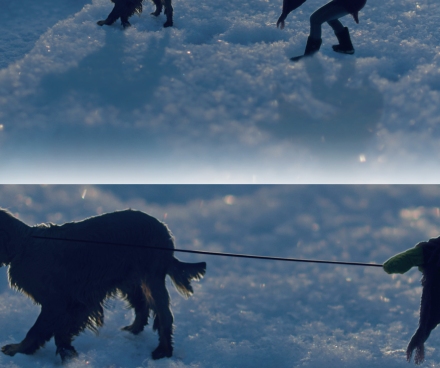
Tiina was standing there holding onto the leash, while someone off to the left called Eddie.  this made him strain at the leash and put both of them in perfectly natural positions.  I didn’t really like any of the shots I got for both of them, so I used Eddie from one and Tiina from another:2

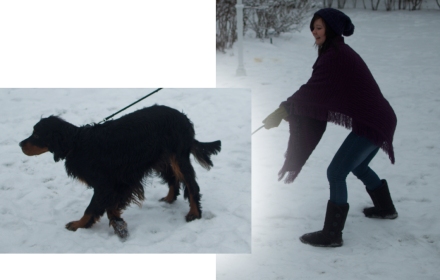
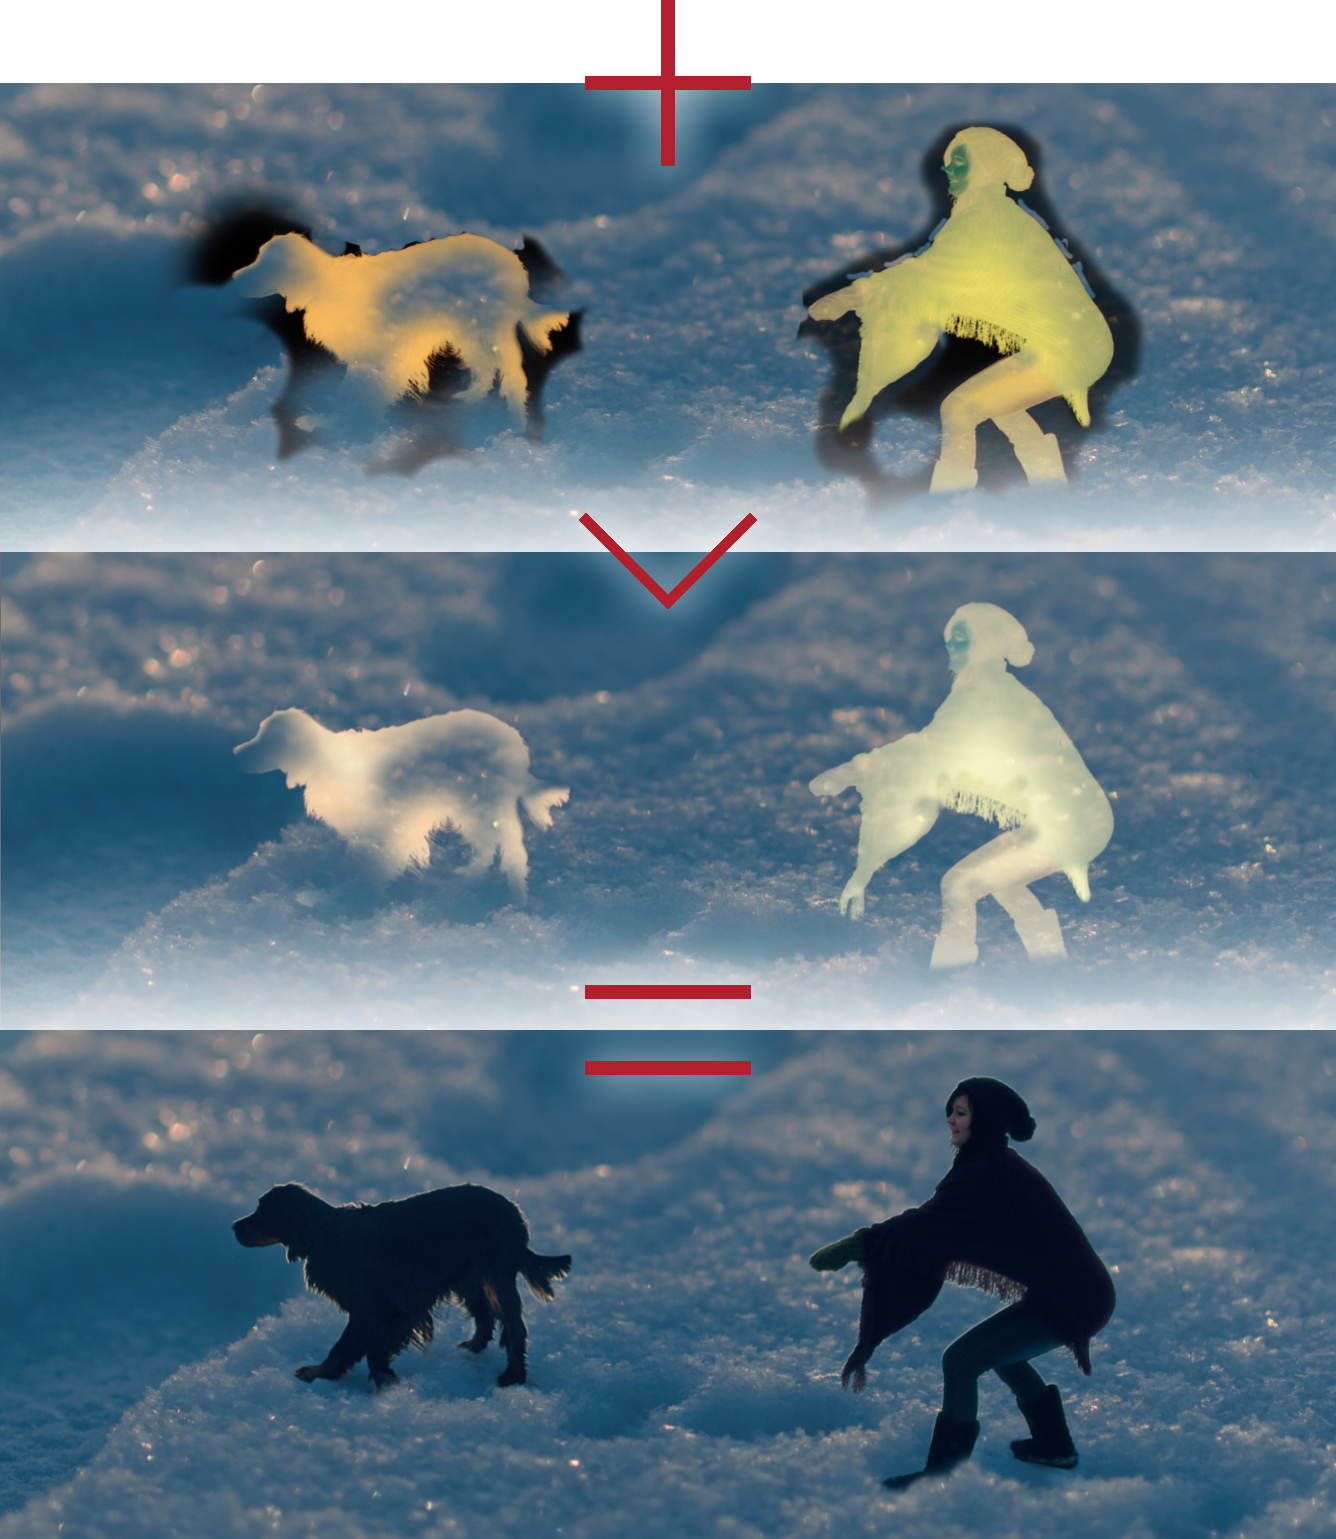
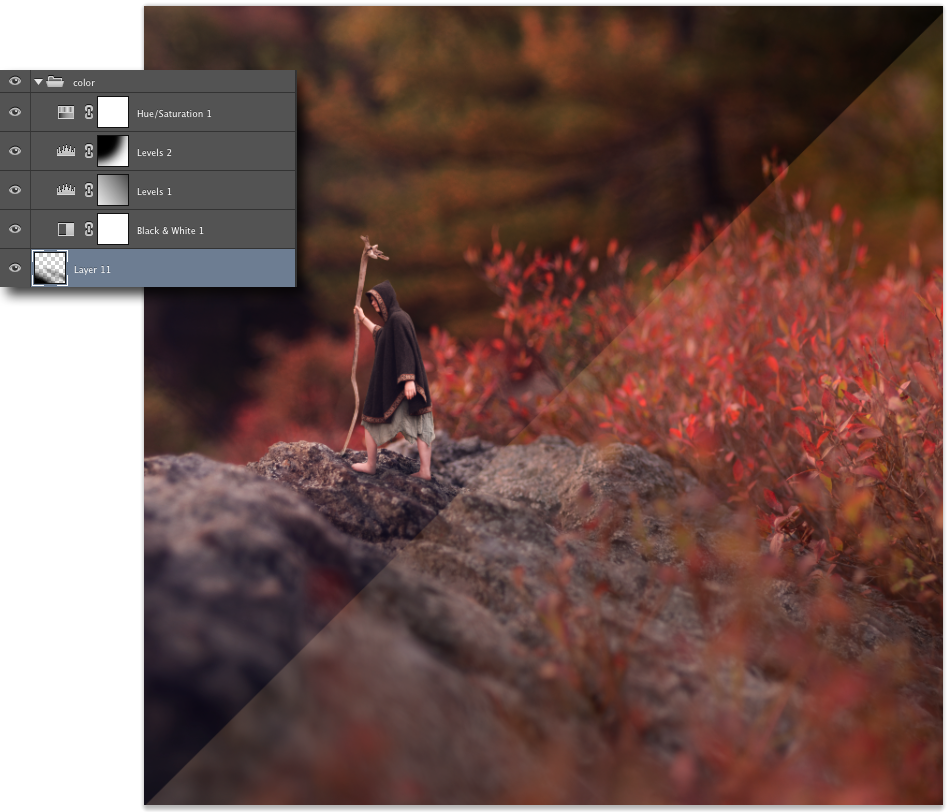
I placed them onto the scene and very roughly cut them out using masks and a brush.  I then set the blend mode of both of their layers to Multiply. basically what Multiply does is make the image only appear where it is darkening the image below it, if it is brighter than what is under it, it disappears. this worked because the snow they are standing on is much brighter than what they are being photoshopped into, but they are much darker.  this saved me a lot of time hand cutting them out, and creates a more perfect edge than one could ever create any other way, preserving the slight blurriness at the edge.  the problem is, they are slightly transparent, and a little dark.  to fix this I could have changed the blend mode to Darken (basically like Multiply but with a more sharp cutoff between dark and light) but that makes the edge of them 100% pixel perfectly sharp, which never looks good.  so I make copies of each of them, set the blend mode to Normal and erased the entire edge of them so they only existed inside the originals.  now they still have slightly transparent edges, but I usually make edges of littlefolk a little transparent anyway, it blends them in.  also, it will come in handy later. using the magic wand I select the rough shape of both of them and apply that to a mask in a levels adjustment layer.  in the adjustment I up the blues and greens in the shadows a bit to better match the background image:

3

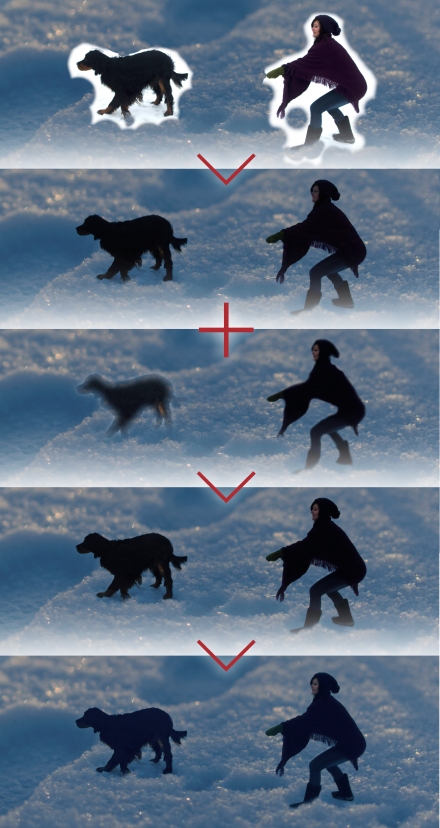
now I got done with all of that and… somehow they just don’t fit. this is the issue with the fact that the picture of them was taken in very different conditions then the background was. to fix this, I thought that adding bright fringes to the edges of them, like would appear when shooting this low angle into the sun, might fix the problem. how I went about doing that is by copying Eddie and Tiina (the ones set to Multiply, not the Normal blend mode ones with the edges erased). for the moment, I hide the originals (the little eyeball button next to the layer).  now I invert the colors on both of the new copies, and set the blend mode of both to Screen.  Screen, is the exact opposite of Multiply.  instead of only appearing where it darkens what is below it, it only exists where it brightens what is below it.  after inverting the colors, the snow around them is black, so it disappears, but they are almost white.  I now put these copies underneath the originals, and make the originals visible again.  using transform, I make the copies slightly bigger than the originals, so they are peaking out in a lot of places.  now, the fact that the edges of the characters was slightly transparent means the this new bright layer underneath is affecting the edge a little, which really sells the effect:4

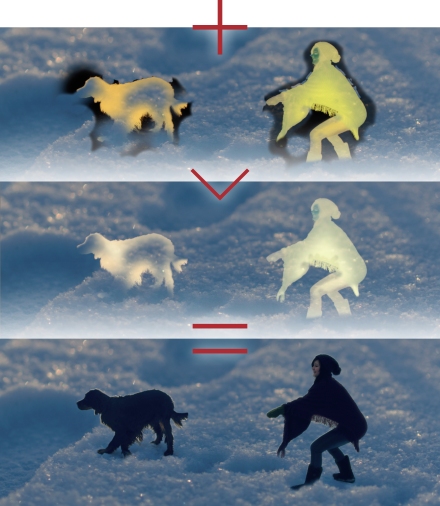
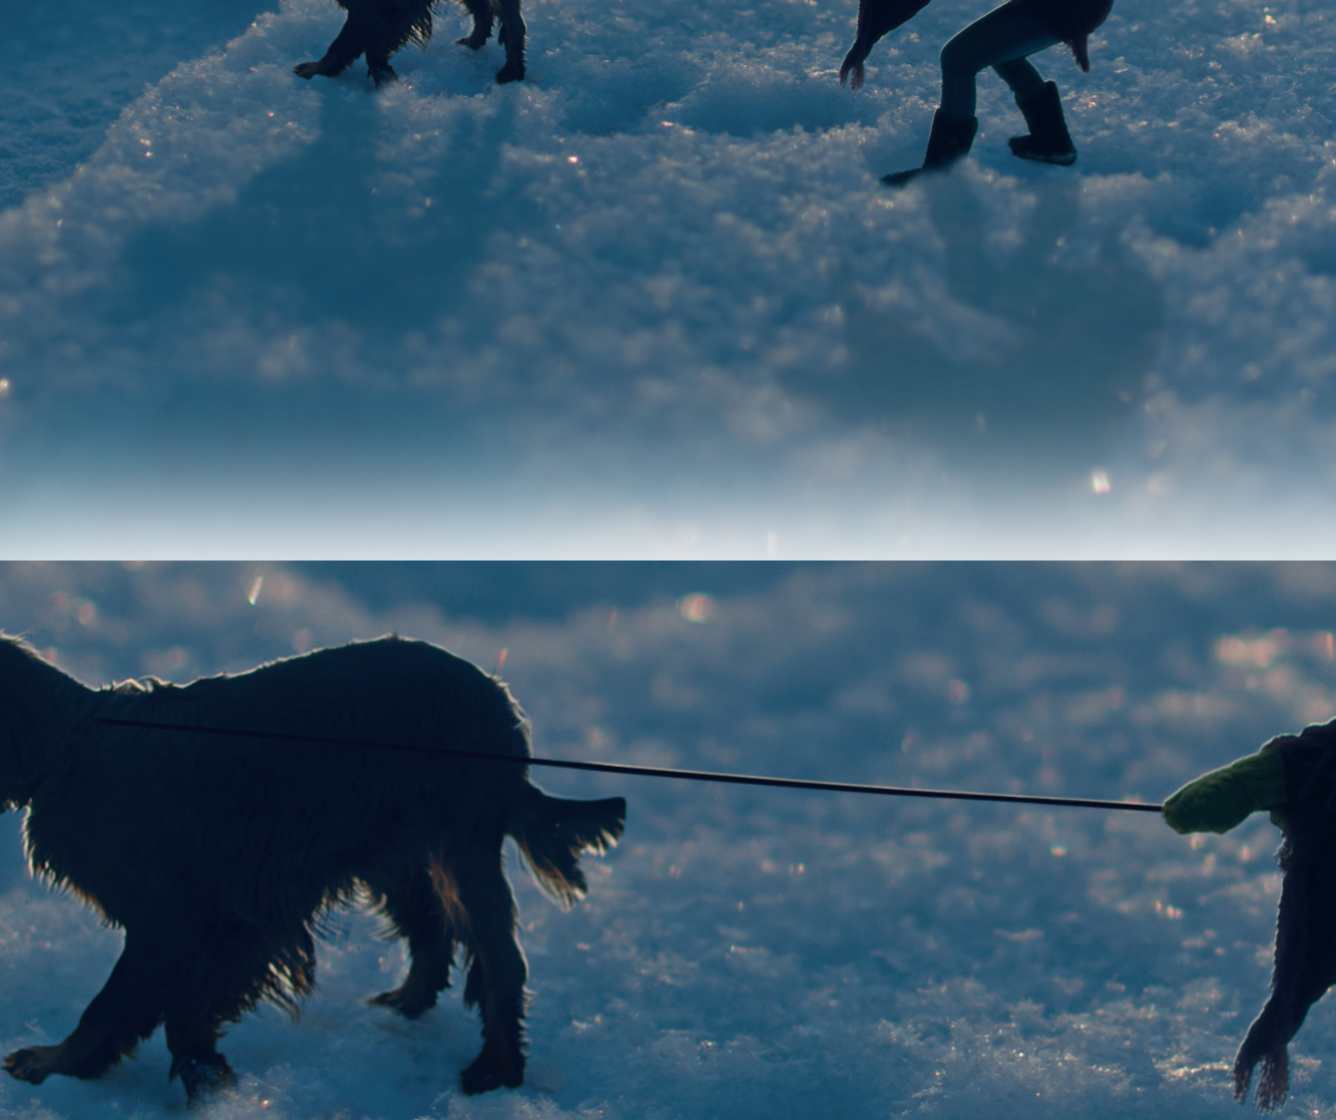
I now drew the shadows in, (just mirrored versions of the originals, with the colors changed to a blue slightly darker than the snow around them).  the leash is just a drawn line with an outer glow and an emboss:

5

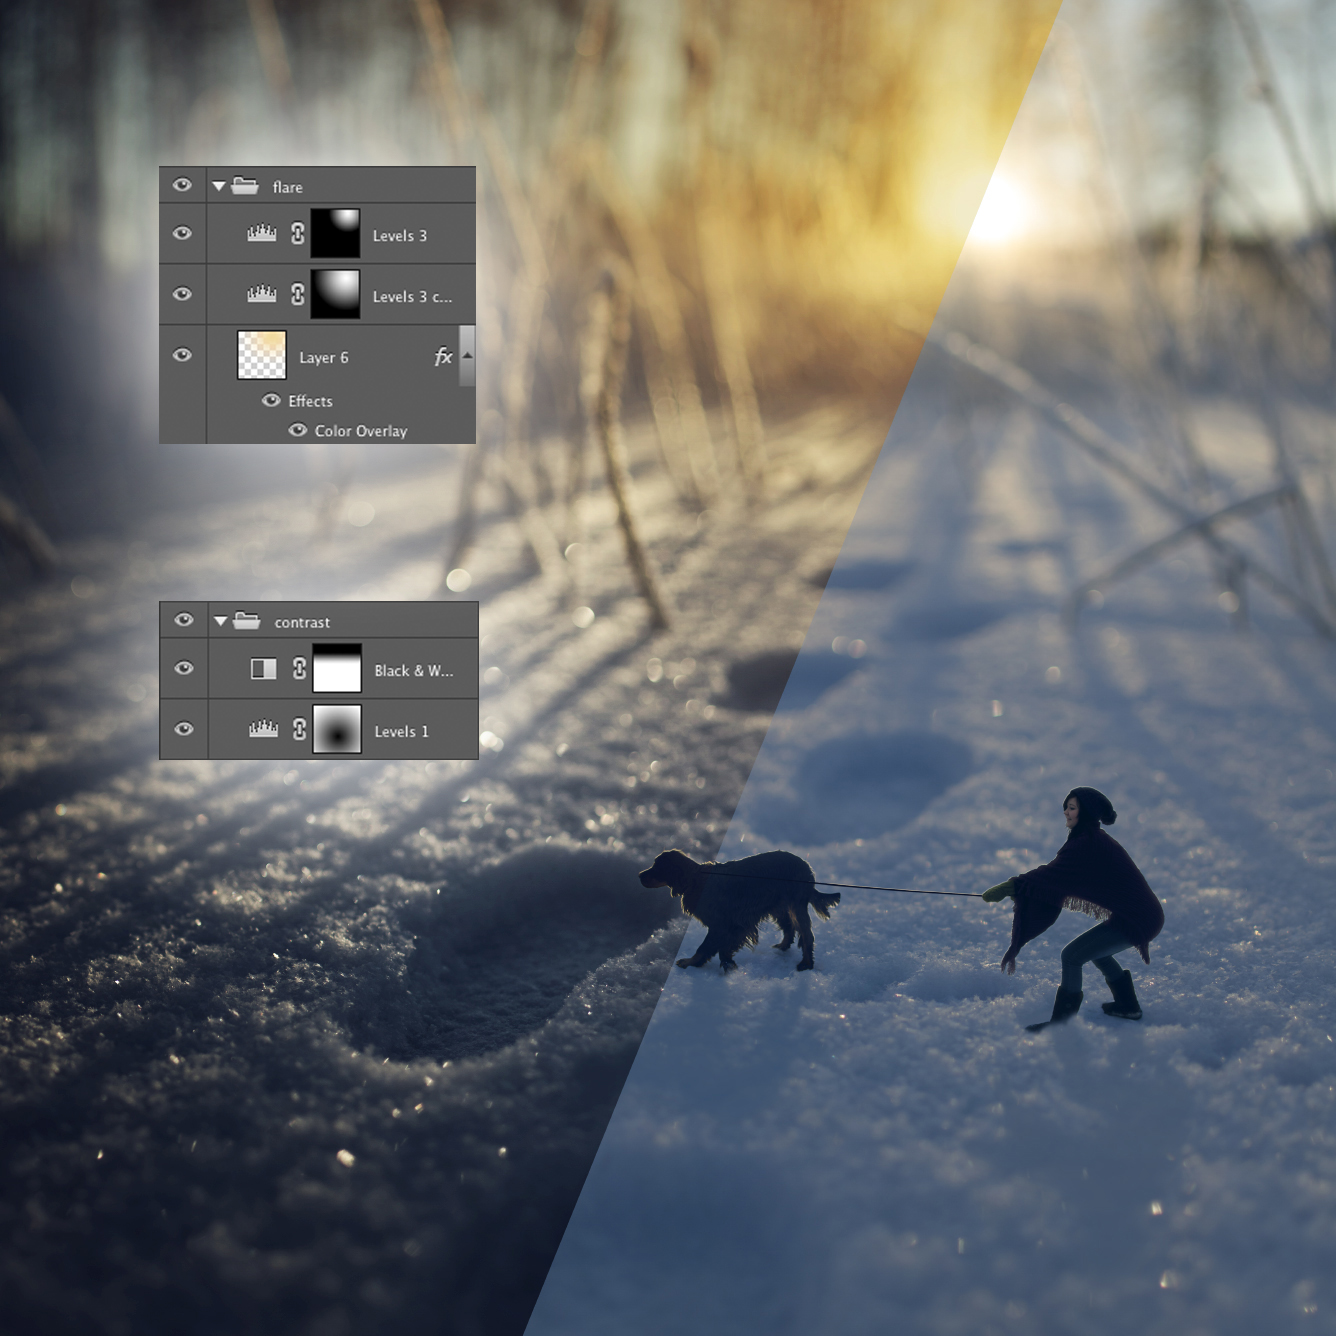
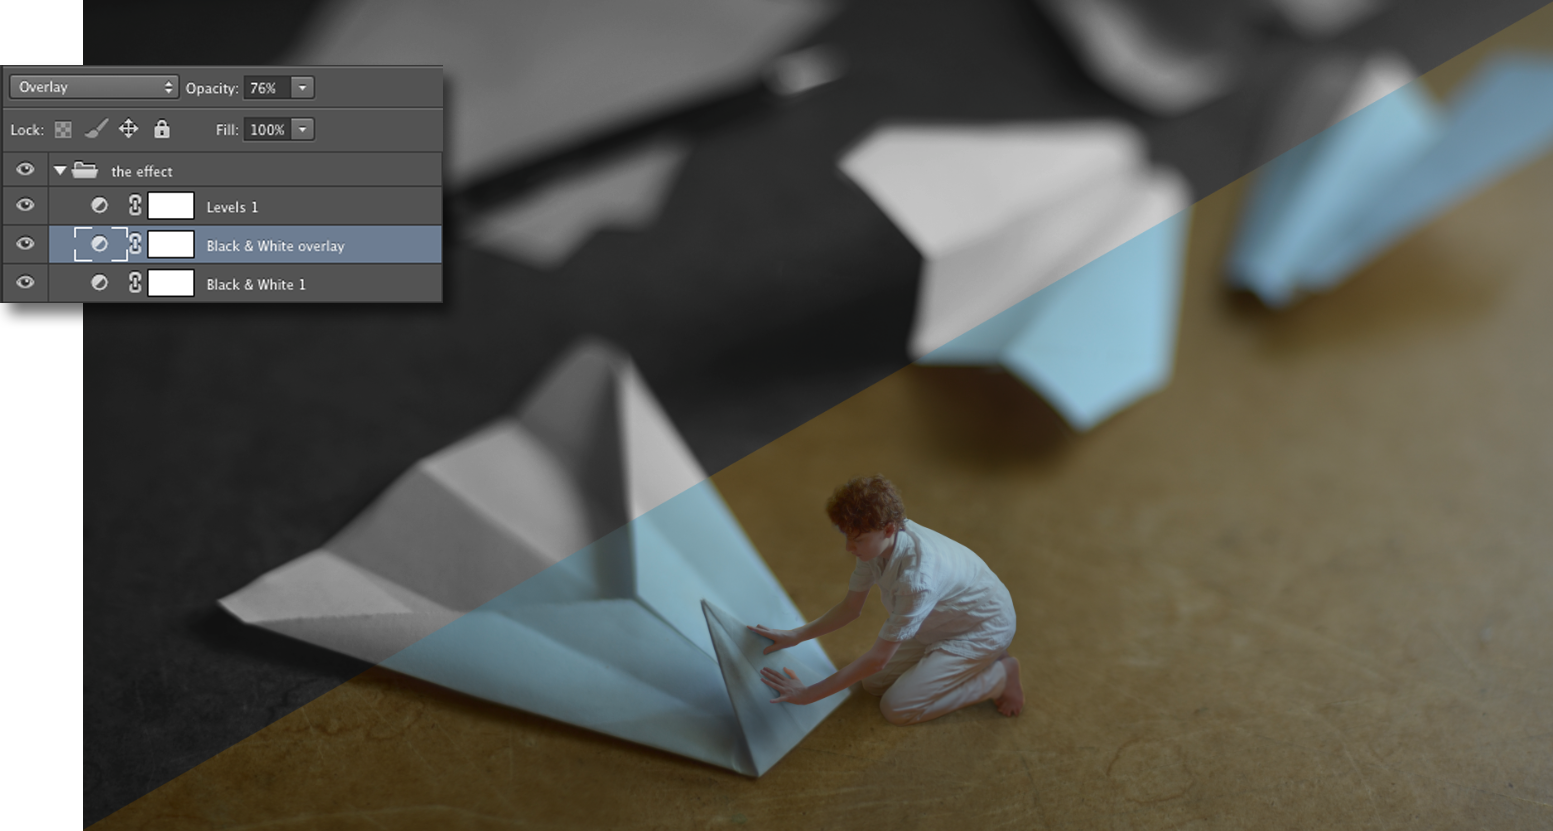
now for the color editing.  the first thing I do to a lot of pictures, is try a Black and White layer, set to Overlay.  it adds amazing structured contrast to flatter images. very rarely though, do I have one on 100% opacity.  it is almost always is way too much. for this one though, since the “shadows” were actually only slightly below medium gray, it worked fantastically.  I didn’t really like what it did to the sky though, so I masked out that area. I then added a vignette with a levels adjustment.  both of these adjustments were bellow Eddie and Tiina, because they darken the image a lot, and the models were a little too dark already.  above Eddie and Tiina, I decided to enhance the sun flare. I did this by creating a levels adjustment, bringing up the red, and lowering the blue channels. with a gradient in a mask, I made this only affect the area around the sun.  I copied this adjustment and made the affected area a bit bigger, and in a new layer I drew a large off-white splotch around the sun, at low opacity.  this flare helps the image not be too monotone blue, and makes it feel a little more like sunset:6

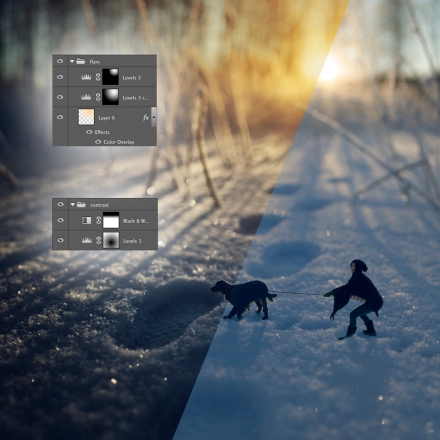
and that is it!  this was a fun picture to edit, because I found some new workarounds, and learned some new techniques.  I hope you learned something new as well.7

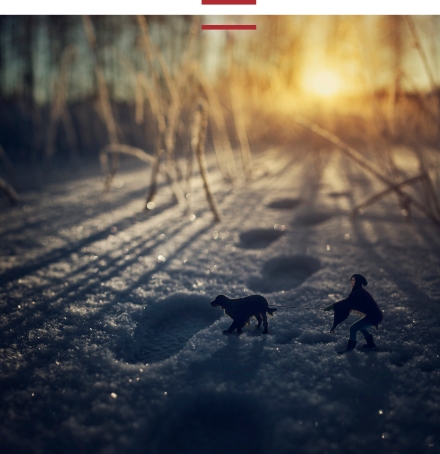
you can see the full size picture on flickr, and keep up to date with new stuff like this on my facebook page.

a day in the woods

aliza here. zev, our mother, and I went to a woodland reserve near our house today. despite getting epically lost on the way there, it was a beautiful trek along trails full of dogwalkers.

when we got to a pond, I started getting zev set up in a sheet we’d brought along in case we needed an emergency cloak. the water was bone-achingly cold, so we had to huddle together on a slippery rock as we got set up. some folks having a picnic on the other bank got a nice show. (credit to mama for the behind the scenes photos)

Image

as we were shooting, it began to rain. zev slopped his way up the bank, dried his feet on the soggy sheet, and we headed off.

in the gathering gloom, as the rain began to give way to a silvery fog, we came across a grove of downy young pine saplings. in a bout of sudden inspiration, zev had me wrap my jacket up in my scarf and tie it to a stick before throwing the sheet/foottowel over me as a cloak and trying to look attractive.

Image

a lady walking her dog by told us that we were “seriously freaking [her] out”. and joggers were liberal in their odd looks.Image

then we headed home and dried off and edited up our respective day’s works.

my photo before and after (with a whole lot of fudging in between):

Image

Image

link: http://www.flickr.com/photos/ummatiddle/10916748435/

zev’s before and after (humongo-extension extraordinaire):

Image

Image

link: http://www.flickr.com/photos/fiddleoak/10914492905/

an afternoon well spent!

new video project — production blog I

this is Aliza here. if you’ve been following Zev’s hints on Flickr, you may know that there’s a very exciting littlefolk video project in the works. the idea has been germinating for a few months now, and just a few days ago we finally had our first evening of shooting! without giving too much away, here are some behind the scenes production shots. that’s our most excellent uncle Orest with the mustache. he’ll be one of the stars of the film.

here you can see something of our set-up. Zev was shooting from atop his bed.

DSC_0379

we covered half the room with black fabric. this was taken while Zev was still figuring out the lighting for the shot.

DSC_0013

Zev giving notes in between takes.

DSC_0376

for a from-above shot, Zev and the tripod teetered atop desks and stools.

DSC_0023

a little preview of how one of the shots might look.

DSC_0042

the (rather ingenious) follow focus that Zev improvised using pliers, a pencil, and a rubber band.

DSC_0075

well, this is what we’ve been up to. pretty exciting stuff. :] stay tuned for more!

traveler BTS

here is a quick behind the scenes on my latest picture ‘traveler’. just a simple littlefolk, but here is a bit of what went into making it.

here is the picture I started with:

ITT_7506

I then took a bunch of extension pictures of the surrounding area:

Screen Shot 2013-10-11 at 4.56.22 PM

merged them all together:

Screen Shot 2013-10-11 at 4.39.45 PM

then I cropped and fuzzed the edges of all the pictures, and here is the background done!:

Screen Shot 2013-10-11 at 4.43.12 PM

now here is the picture of aliza I used:

Screen Shot 2013-10-11 at 5.01.31 PM

I cut out the background, and placed her into the composition, here is a close-up of with and without shadows:

Screen Shot 2013-10-11 at 4.45.12 PM

then I added the color correction:

Screen Shot 2013-10-11 at 4.51.57 PM

and thats it! the final picture (bigger on flickr):

Screen Shot 2013-10-11 at 5.13.38 PM

as I sad above, just a simple shot, but think it came out pretty well mainly owing the the incredible light and colors this time of year.

a lot more to come, but probably not very soon as what aliza and I are working on at the moment is by far our most ambitious and exciting project to date.  stay tuned!

zev

fly — behind the scenes

I havent posted here for far too long, here’s to changing that!  anyway, here is a bit of what went into making my latest picture, fly. it is the second picture in a new (probably) three part series.

Image

—————————————

I started by placing two music stands in a field, the airplanes are taped to string, and then taped to a piece of foam board lying in between two music stands.  I had to use multiple strings per airplane, as it was a gusty day. the foam board not only holds all the airplanes, it also acts as a reflector/diffuser, creating nice soft light on the subjects.

Image
Image

the final picture was taken with a lens that allows me to change the angle of the focus plane (aka the tilt of a tilt-shift lens), so I can have nice sliver of focus, and still have the background grass and trees sharp (or near to it).  here is what the final picture looked like out of camera

Image

and the vantage point from which it was taken.

Image

to shoot the person (me), I tried to match the lighting/background as close as possible, as it will make it easier to cut out in post, and make a cleaner final picture.  sadly there was nothing to hang from in the middle of the field, (no way!) so me and bub (my brother) rigged up a rotting old ladder contraption. it certainly doesn’t meet code, and it wasent even quite tall enough, so I had to do two pictures, one for my legs and one for my upper body.

Image

—————————————

after a whole lot of masking, a bit of color correcting and a few hours, the final picture makes a whooshing noise as it is uploaded to the internet.  you can see it full size here.Image

behind the firebreakers photoshoot

for the teleidescope theme  “freeze/warmth” nellie (aliza) and I (bobo/zev) have been talking for a while of doing a picture with fire and water. at long last, and rather on the proverbial spur of the moment, we piled into the car with our good friend eunice (or couth), brothers, mothers, torches and towels and headed to Nantasket beach just in time for sunset.

arriving at the beach, as the last glimmer of sun disappears (by couth):

once dipped in oil, we light the torches (by couth):

then set out in to the water (by couth):

and I start shooting, and shouting directions (by couth):

here are some outtakes that I shoot (by zev (me!)):

and the finale picture (by me):

after shooting, we sit on the beach and eat Indian food we picked up on the way there (by nellie):

and then we watch a amazing unexpected fireworks show (by nellie):

what a day.  here is a stop motion animation by couth of the whole evening: